HVAC VFD Repair

HVAC VFD RepairHVAC VFD repair should be taken with extreme caution. HVAC VFD repair should only be performed by technicians who have required training and experience to work with electrical equipment. Precision Electric strongly recommends to consult an expert in the field when repairing HVAC VFD equipment.

Many HVAC VFD controllers have an internal DC bus that retains a charge after power has been cut to the drive, as a result, it does not mean it’s safe to work with. Technicians working with HVAC VFD repair must always take extra precautions to ensure proper safety measures are taken, or injury or even death may occur.

Precision Electric has spent years working with electrical components and HVAC VFD controllers, DC motors and VFD controllers, servo motor and servo VFD systems, and other related industrial electrical equipment. The troubleshooting techniques for each brand of VFD can be unique, but the overall structure of troubleshooting always remains the same.The ultimate goal when performing HVAC VFD repair is to diagnose, repair and re-commission the unit as quickly as possible, and there are steps that should be taken before anydis-assembly takes place.

Precision Electric has been performing HVAC VFD repair since 1983 and all repairs performed by Precision Electric includs a 1-year in-service warranty. The Precision Electric in-service warranty begins the same day that equipment is put into service and ends 1 year later. The Precision Electric in-service warranty was implemented to give manufacturers incentive to keep spare equipment in rebuilt condition to minimize downtime and maximize production.

Here are all the steps illustrating how Precision Electric performs HVAC VFD Repair:

1. Take Notes –HVAC VFD Repair

This is often a subject that is passed by many individuals who are attempting to repair industrial electrical equipment. Before Precision Electric begins to perform HVAC VFD repair, qualified technicians take note of many important aspects of the equipment including, but not limited to:

    1. HVAC VFD Manufacturer
    2. VFD Serial Number
    3. Reason for Service
    4. Urgency (Rush Overtime or Standard)
    5. Visual Inspection of External Device

2. Conduct Diode and IGBT Tests –HVAC VFD Repair

There are a number of methods to test the input and output power sections of HVAC VFD repair orders, and this step is essential prior to applying power to the VFD unit. If for any reason there is a short on the input side or output side of the VFD, further damage can be caused to the unit if power is applied to it.

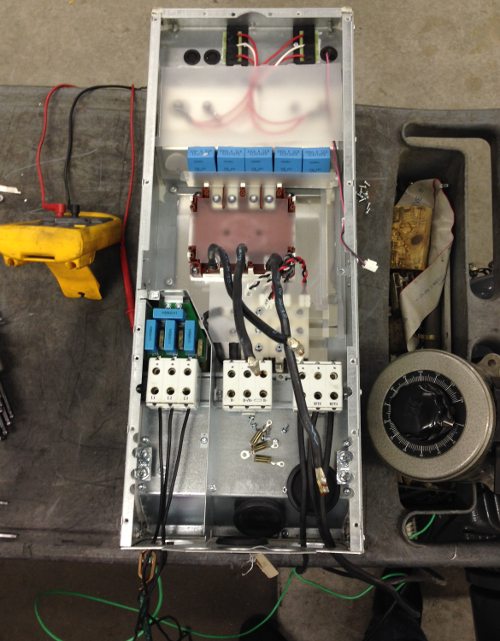
For this reason, Precision Electric uses meters to properly test the input and output power sections of the VFD prior to applying power to the actual unit. If a short is found, the unit can be disassembled and the cause of the short can be diagnosed and quoted for repair. If the repair is too costly, then a replacement is offered to the customer.

3. Power Up Unit –HVAC VFD Repair

HVAC VFD RepairIf the input and output power sections test healthy during this step of the HVAC VFD repair process, Precision Electric will power the unit and perform amp reading and output frequency tests. Precision Electric prefers to slowly increase power voltage to the unit until the rated input voltage of the VFD is achieved.

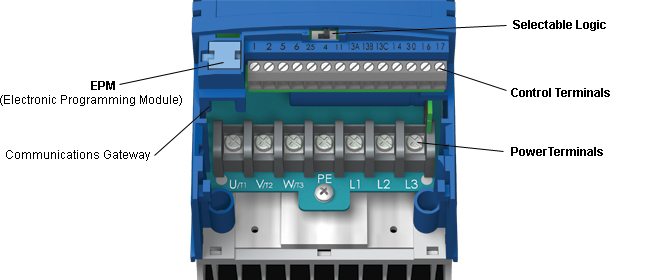
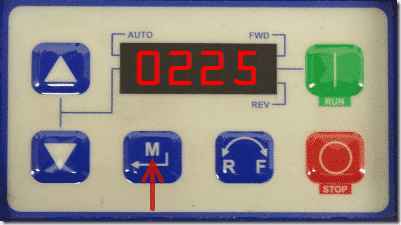
Depending on whether or not the VFD provides a display will determine what further action(s) will be taken. If display is unavailable, dis-assembly and diagnosis of the internal power supply of the control section of the VFD is likely necessary to further evaluate cause of failure and establish cost and lead time for the HVAC VFD repair.

4. Run A Motor –HVAC VFD Repair

If the previous three tests have passed during the HVAC VFD repair process, then it is time to run a basic jog function of the VFD with a simple template program. Often when a VFD comes into our facility, we make sure to backup whatever program is currently stored in the VFD prior to inputting a template program and running a test procedure. This ensure we have a backup copy of the program.

The best method for backing up depends on the brand of drive, but after it has been backed up, we either reset the HVAC VFD to factory defaults through the keypad and recommission a basic start, stop and job application or closed loop if an encoder is involved. If the motor will not run, it will be necessary to check the output voltages and current ratings going to the motor to see if the VFD is functioning properly to rotate the motor.

5. Contact Customer –HVAC VFD Repair

At this point we have determined the cause of failure, estimated lead time and cost of the HVAC VFD repair. If the HVAC VFD has tested good entirely, then further underlying issues are communicated with the customer. This is when Precision Electricwill gather application specific information from the customer to establish whether or not it may be some outside issue associated with the system including, but not limited to, PLC communications, faulty IO, bad wiring or even bad cabling. There is no single way to do this step, as it really depends on a wide variety of variables.

6. Send Service Tech –HVAC VFD Repair

If the customer cannot establish failure on any other aspect of the machine and the HVAC VFD appears to test fine, then it may be necessary to send a Precision Electric field service technician on site to establish cause of failure. Precision Electricfield service technicians are trained to troubleshoot any issue ranging from standard HVAC VFD repair, to advanced robotics, PLCs and more. Precision Electric field technicians are trained to establish cause of failure and come up with solutions as quick as possible.

To learn more about HVAC VFD Repair or for HVAC VFD Repair Quotes, contact Precision Electric, Inc.


VFD Single Phase to Three Phase

VFD Single Phase to Three PhaseA VFD (variable frequency drive) is an electric motor drive and although it will convert single phase to threephase it should never be used as a power source for control circuits, instrumentationcircuits, or to operate other electronic components. The solution should be to isolate and feed the machine control circuit from a separate single phase source and feed the motor from the VFD output. Controlcircuits are almost always single phase even when the machine input is threephase. VFD’s that are rated for three phase input must beproperly rated when single phase inputis used.Mains (input) current will be much higher when single phase power isapplied to three phase rated equipment. Components within a three phase VFD of the same horsepower ratingwill most often not be rated for enough current and will fail. A mathematicalcalculation based upon the motor full load current will determine which VFD touse for the application. When applying single phase to a three phase rateddrive, the horsepower of the drive will always be a higher rating than the motor horsepower rating.

Installation and Commissioning

A contactor or transition switch should never be used on the output of a VFD.Wiring from the VFD output terminals should go directly to the motor. A contactor may beused on the input but never on the output. Properly rated circuit breakers or fuses should always be usedon the input of a VFD.Motor rated circuit breakers and fuses will allow too much currentto pass for too long. Electronic components are less tolerant of short term overcurrent conditions than motors. This information is found in the VFD User Manual.Installation of a VFD and other related equipment should only beperformed by qualified personnel.VFD programming is typically easy for most applications. Programming for anapplication can usually be successfully performed once user manual has been read.


Brushless Servo Motors

Brushless Servo MotorsBrushless servo motors are used when an industrial application requires high performance and precise speed regulation. Brushless servo motors are manufactured with a designated controller known as a servo drive or servo driver.Brushless servo motors use position feedback to precisely regulate motor control by being paired with an encoder. Encoders measure a brushless servo motor’soutput shaft position which is compared to the command position. When the brushless servo motor output shaft doesn’t match the demand signal, an error signal is sent to the servo motor controller; the controller adjusts accordingly and sends a signal back to the servo motor until the demand position is met. Brushless servo controllers (servo drive, driver, etc.) are never included in the base price of the brushless servo motor. Brushless servo motor systems can be expensive but the cost is justified with optimal manufacturing processes via precise speed regulation.

Brushless Servo MotorsBrushless servo motors output more torque than brushed direct current motors. Brushless servo motors aren’t as loud during operation than brushed direct current servo motors. The lifespan of brushless servo motors exceeds than that of a brushed direct current motor because there aren’t brushes or a commutator to maintain. The idea behind brushless servo motors was to be able to integrate control function of the servo motor with industrial electronic components and personal computers; and to precisely position machines in manufacturing processes. Some manufacturers use brushless servo motors in explosive and dirty environments because brushless servo motors are entirely closed and sealed to prevent dust or sparks to reach the servo motor parts.

Single Phase to Three Phase Converter

Variable frequency drives can be used as a single phase to three phase converter for AC electric motors. Most variable frequency drive manufacturers design products up to 3 horsepower to convert single phase to three phase. Precision Electric offers solutions for customers looking to convert single phase to three phase electric motors that exceed 3 horsepower. Precision Electric also offers variable frequency drives to convert 120 volt single phase to 220 volt three phase for AC electric motor applications through the 1.5 horsepower range.

De-rating for 1 Phase Supply

For AC electric motor applications that exceed 3 horsepower, some variable frequency drives can be de-rated for single phase power supply. Lenze Americas is a variable frequency drive manufacturer in the United States that offers drive products above 3 horsepower that can be de-rated for single phase power supply. Lenze uses a simple formula to de-rate a three phase drive for single phase power supply. The formula Lenze Americas uses to determine the size drive they manufacture and apply on such applications, is as follows:

  1. Single Phase to Three Phase ConverterCheck the AC electric motor nameplate full load current (amps) and multiply it by 1.73.
  2. Choose a three phase Lenze drive that is good for the new current rating.
  3. Upon installation, wire the single phase supply to the input of terminals 1 and 2 on the Lenze converter.
  4. Leave 3rd terminal on the input of the converter open.
  5. Install the 3 electric motor leads on the output of the Lenze converter.

Never wire or install a variable frequency drive without proper training. Call a qualified electrician to install and wire a variable frequency drive for industrial AC electric motors. Call or email Precision Electric today for technical support or to correctly size a variable frequency drive for a single phase to 3 phase converter.


What Is The Default Password For An AC Tech SMVector VFD?

What Is The Default Password For An AC Tech SMVector VFD?

All AC Tech SMVector drives come equipped with a default password to protect the drive from operators changing parameters without the programmers consent. Although this process can be confusing the first time you open your AC Tech SMVector VFD, or Variable Frequency Drive, it is easy to do once youve done it once.

Password protection is becoming more and more prominent in the world of Variable Frequency Drives and the SMVector illustrates this process right out of the box. The purpose of protection is to keep the program within the drive protected from outside modifications or to allow OEMs to protect their proprietary configurations when selling a machine.

Many customers also opt to purchase a EPM module for their SMVector drive to keep their configuration files backed up to a separate module, just in case of a drive failure or EPM program failure. Whatever the reason for accessing the parameters, the process of accessing the parameter menu is extremely easy.

Abstract:

This article illustrates how to access the parameter menu using the keypad on the SMVector drive with the default password.

What Is The Default Password For An AC Tech SMVector VFD?:

1. Power up your SMVector drive, the default screen that is displayed is typically the Stop screen as shown below. Note: You can access the parameter menu while the drive is in run as well, but not all parameters can be changed while in run mode.

Step 1 - SMVector Keypad LCD - Stop

2. Press the Menu button.

Step 2 - SMVector Keypad LCD - Menu Button

3. The word PASS will flash on the screen.

Step 3 - SMVector Keypad LCD - Password

4. After the PASS screen is displayed, you should be greeted with four zeros to enter your password. Hold the Up arrow key to increase the number.

Step 4 - SMVector Keypad LCD - Press And Hold Up

5. Once you have reached the default password of 0225, press the Menu button again to enter it.

Step 5 - SMVector Keypad LCD - Enter Default Password

6. You should be greeted with the P100 parameter, press the up arrow key to scroll through the parameters and continue to access the parameters with the Menu key.

Step 5 - SMVector Keypad LCD - Parameter Menu

Conclusion:

If you run into any issues when accessing your SMVector parameter menu, feel free to contact us for support. Precision Electric takes pride in offering technical support services to all of their existing or future customers.

Convert Single Phase to Three Phase

Lenze AC Tech SMVector Drive Acceleration Time Parameter

In this article I will discuss how to program the Lenze-AC Tech SMVector acceleration time parameter. The Lenze-AC Tech drive acceleration time parameter is very simple to change.

The Lenze AC Tech SMVector drive acceleration time parameter default is 20 seconds for the motor to reach full speed (rpm). For most applications, 20 seconds is not efficient. Most applications using the Lenze-AC Tech SMVector desire an acceleration time of about 4-5 seconds.

To change the Lenze-AC Tech SMVector acceleration time parameter you will first need press the “M” button on the drive keypad. Once you’ve pressed the “M” key, The “PASS” flashes on the screen for a couple seconds and is replaced with “0000”. Using the arrow keys this should be changed to the password. Default is “225”.

After you’ve entered the password into your Lenze-AC Tech SMVector drive you will need to press the “M” key again. Now the screen will say “P100” which means you can now change the acceleration time parameter on your Lenze-AC Tech SMVector drive.

Simply press the arrows on keypad until you come to “P104” which is the acceleration time parameter for the Lenze-AC Tech SMVector drive. Once you see “P104” on the drive screen, press the “M” key again. Now use the arrow keys until you’ve reached your desired acceleration time for your Lenze-AC Tech SMVector drive application.


How We Repair Servo Drive Servo Motors Professionally

how-to-repair-servo-drive-servo-motors-professionally

We repair and warranty all major AC and DC Servo Motors and Controllers, feel free to call now at 1-877-625-2402 for a free quote orfill out the Servo Motor and Drive Quotation Form. For those of you looking to repair the drive yourselves, our procedure for professional repair is listed below.

For those interested in repairing servo motors and servo drives, it is important to note the extreme care that should be taken prior to conducting any disassembly of a servo motor or servo drive unit.

All servo motor and servo drives are mechanically calibrated between multiple facets of the unit to ensure the proper positioning of the device when it is commissioned. Failure to properly dis assemble a servo motor or drive can actually cause the unit to become unusable in the future.

The inner workings of servo motors and servo drives are both separate, and thus they should be treated separately. This particular article focuses primarily on troubleshooting the servo motor that is connected to the servo drive.

Servo motors are specifically designed with what is known as “feedback” capabilities so that the servo drive can maintain positioning of the motor within fractions of an inch, and many times even more accurate when necessary. Servo motors are specifically designed to withstand high amounts of holding current as well as extremely fast start stop procedures so that accuracy can be maintained at all times.

This feedback connected to a servo motor often comes in the form of an encoder or resolver, depending on the type of encoder or resolver you might have, troubleshooting your servo motor may be impossible. In many cases, manufacturers such as Allen Bradley, or Rockwell, implement a proprietary resolver or encoder feedback so it cannot be repaired without their diagnosis and repair tools. Regardless, there are many more aspects to a servo motor that can go bad other than the encoder or resolver – so it is best to start at those places.

The following is the procedure used by Precision Electric illustrating how to repair servo drive servo motors professionally.

Step 1: Take Notes

This is often a subject that is passed by many individuals who are attempting to repair industrial equipment. When a unit first hits our bench we make note of many important aspects of the equipment including, but not limited too:

    1. Manufacturer
    2. Serial Number
    3. Reason for Service
    4. Urgency (Rush Overtime or Standard)
    5. Visual Inspection of External Device

Step 2: Check The Shaft

It is important at this point to establish whether or not the servo motor shaft has been bent, damaged or broken. If this is the case, a new shaft may need to be ordered or machined in order to recommission the unit. In some cases, a bent shaft cannot even be replaced and this can quickly become a quote for replacement.

A bent shaft on a servo motor can cause extreme wear to the device over time due to vibration and heat. A bent shaft can also cause slip on a gear box and loss in positioning resulting in unexpected faults from the servo drive. You may need to use a caliper to establish the proper positioning of the shaft within the closest accuracy possible.

Step 3: Check The Encoder and Motor Cables

Hopefully the customer sent the communications cable with the unit so you can test the pin-out of the cable to ensure all of the wiring has a strong signal. In instances such as these, you may need to pull up pinout information from the servo motor manufacturing website to ensure you are testing the appropriate cables. In many cases, an encoder cable with have a pin for each channel of A, A not, B, B not, Positive Voltage and Common.

In some cases it will also have a Z and Z not pulse as well as a shield. Of course, not all customer are able to send the cable with the unit because they sent you a spare to repair – if that is the case you are really left with no other choice than to move on to the next step. Finding a bad cable early on is a great way to solve servo motor feedback issues without ever even requiring disassembly of the servo motor.

For the motor cable, you are looking at 3 separate phases, 2 armature wirings and sometimes commutation wiring. Using your meter, test the end of each cable to ensure there are no shorts between any of those connections.

Step 4: Check The Bearings

The shaft coming out of the servo motor should rotate freely with little resistance. This is assuming you have actually disconnected the cables from the original servo drive. The drive often causes resistance when rotating the shaft if it is connected to the servo drive through the motor cables.

If there is “bouncing” when attempting to rotate the shaft then it is likely due to a short within the motor or a bearing beginning to fail. In either case, it is bad and the servo motor will need to be disassembled for further diagnosis.

Step 5: Test The Motor For Shorts

This step is essential to further diagnostics. At this point you need to test the motor to ensure there are no shorts within it. Using your meter, you will want to test from phase to phase to ensure the connections are open. Do the same with the armature connections. There should be no shorts between them. If you find a short at this point it is likely the cause of the failure.

Servo motor shorts can be caused from a variety of reasons including contamination, overheating and wear and tear – the only real way to find the source of the short is to disassemble the unit and establish the cause of failure.

Step 6: Rotate the Motor

Assuming the prior tests have all passed, apply a small voltage starting from 0 volts to the armature winding of the servo motor. Slowly increase this voltage using your variable power supply until the shaft begins to turn. It is at this point you can further evaluate whether there is unnecessary vibration of the servo motor during rotation or whether the shaft appears to wobble or “bounce” due to a bent shaft or bad bearing.

In any case, rotating the motor prior to disassembling it is a good idea if it is possible – this will let you know that the servo motor at least functions on some level prior to establishing the original cause of the failure.

Step 7: Contact the Customer

If everything has tested healthy at this point it may be a good idea to contact the customer and get more details as to the original cause of failure. It is quite common with servo motor and servo drive applications that the cause of the failure was external to the motor itself. The servo motor often was doing what its job was intended to do, stop within a fraction of an inch of inaccuracy and fault.

Most people do not realize that an outside application change or environmental change can cause fluctuations in the configuration of the servo motor that can cause faults. It is also important to establish whether or not the servo motor was properly tuned for the application to begin with. Sending a field service tech and getting the servo motor properly tuned may cause the issue to go away.

Step 8: Carefully Disassemble The Servo Motor

When we say carefully, we mean carefully. You should mark the location of every detached piece with a punch to or file to ensure you reassemble the unit exactly as it was assembled. Failure to do this will often cause the servo motor to produce exceeding level of vibration which can cause further failures or not function at all. It is also sometimes wise to take photographs as you are disassembling the unit so you have a log of how the servo motor looked prior to each phase.

This section cannot be emphasized enough, as you remove more and more pieces of the servo motor take a closer visual inspection of each element within the motor including the commutator, armature, shaft and brushes. Try to locate any possible cause of failure before continuing to disassemble the drive. The sooner you find the cause of failure at this point the better, as it means less reassembly is required.

Once you have established the cause of failure your response will depend on both the manufacturer of the servo motor and the original cause. In many causes, certain brands will not allow you to purchase parts for their servo motors and a replacement may be required. There are certain aspects of a servo motor that can be replaced or repaired by third parties such as the armature winding or brushes.

Step 9: Send a Tech

If the customer cannot establish failure on any other aspect of the machine and the servo motor appears to test fine and be in good shape after disassembly, then it may be necessary to send a field service technician on site to establish cause of failure.

Our field service techs are trained to troubleshoot any issue ranging from standard AC Motor Speed Controllers to advanced robotics and PLCs. They are trained to establish cause of failure as quick as possible.

Conclusion:

Precision Electric has used these techniques over the past 20 years to establish one of the best reputations for the industrial service industry. These methods for testing servo motors have been well established and have resulted in the repair or replacement of thousands of industrial servo drive servo motors.


How We Repair AC Motor Speed Controllers Or VFDs Professionally

We repair and warranty all major AC and DC Motor Speed Controllers, feel free to call now at 1-877-625-2402 for a free quote or fill out the Digital AC or DC Drive Quote Request Form. For those of you looking to repair the drive yourselves, our procedure for professional repair is listed below.

The industrial electronics repair industry is one that should be taken with extreme caution. For those who do not have the required training or experience to work with electrical equipment, it is strongly recommended you consult an expert in the field when repairing equipment such as AC Motor Speed Controllers.

Many AC Motor Speed Controllers have an internal DC bus that retains a charge after power has been cut to the drive, as a result, just because line power is cut off from the equipment, it does not necessarily mean it is safe to work with. You must always take extra precautions to ensure proper safety measures are taken and injury or even death do not occur.

Precision Electric has spent years working with electrical components and AC Motor Speed Controllers as well as standard DC and Servo Motor Speed Controllers. The troubleshooting techniques for each brand of drive can be unique, but the overall structure of troubleshooting always remains the same. The ultimate goal when repairing an AC Motor Speed Controller is to diagnose, repair and re-commission the unit as quickly as possible, so there are some steps that should be taken before anydis assemblyeven takes place.

Here are all of the steps illustrating how Precision Electric repairs AC motor speed controllers professionally and quickly:

Step 1: Take Notes

This is often a subject that is passed by many individuals who are attempting to repair industrial equipment. When a unit first hits our bench we make note of many important aspects of the equipment including, but not limited too:

    1. Manufacturer
    2. Serial Number
    3. Reason for Service
    4. Urgency (Rush Overtime or Standard)
    5. Visual Inspection of External Device

Step 2: Conduct Diode and IGBT Tests

There are a number of methods to test the input and output power section of a drive, and this step is essential prior to applying power to the unit. If for any reason there is a short on the input side or output side of the drive, further damage can be caused to the unit if power is applied to it.

For this reason, we use a meter to properly test the input and output power sections of the drive prior to applying any power to the actual unit. If a short is found, quite often the unit can be disassembled and the cause of the short can be diagnosed and quoted for repair. If the repair is too costly, then a replacement is recommended.

Step 3: Power The Unit

If the input and output power sections of the AC Motor Speed Controller test healthy, then now is the time to power the unit up to see what we get. It is at this point that all of the safety precautions must be taken to ensure death or injury do not occur. On our test bench, we prefer to slowly increase the voltage to the unit until the rated input voltage of the drive is achieved.

Depending on whether or not the drive gives us a display will determine what further action will be taken. If no display is available, dis assembly and diagnosis of the internal power supply of the control section of the drive is likely necessary to further evaluate cause of failure and establish a quotation.

Step 4: Run A Motor

If the previous three tests have passed, then it is time to run a basic jog function of the drive with a simple template program. Often when a drive comes into our facility, we make sure to backup whatever program is currently stored in the drive prior to inputting a template program and running a test procedure. This ensure we have a backup copy of the program.

The best method for backing up depends on the brand of drive, but after it has been backed up, we typically will either reset the AC motor speed controller to factory defaults through the keypad and recommission a basic start, stop and job application or closed loop if an encoder is involved. If the motor will not run, it will be necessary to check the output voltages and current rating going to the motor to see if the AC motor speed controller is “firing” properly to move the motor.

Step 5: Contact The Customer

Usually at this point we have established some failure in the unit, if for some reason there seems to be no issues at this point further communication with the customer is often necessary.

At this point we will gather application specific information from the customer to establish whether or not it may be some outside issue associated with the system including, but not limited to, PLC communications, faulty IO, bad wiring or even bad cabling. There is no single way to do this step, as it really depends on a wide variety of variables.

Step 6: Send a Tech

If the customer cannot establish failure on any other aspect of the machine and the drive appears to test fine, then it may be necessary to send a field service technician on site to establish cause of failure.

Our field service techs are trained to troubleshoot any issue ranging from standard AC Motor Speed Controllers to advanced robotics and PLCs. They are trained to establish cause of failure as quick as possible.

Conclusion:

Precision Electric has used these techniques over the past 20 years to establish one of the best reputations for the industrial service industry. These methods for testing AC motor speed controllers have been well established and have resulted in the repair or replacement of thousands of industrial AC motor speed controllers.