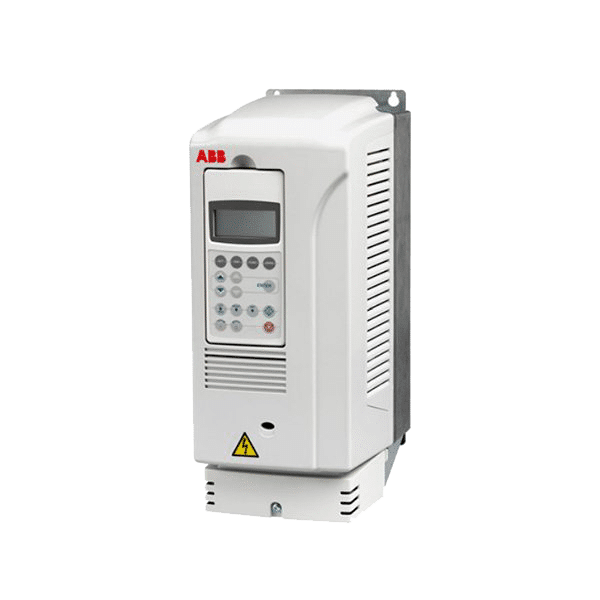
ABB ACS355 Training Lesson 9: Motor Vector Speed Control Tuning – Variable Frequency Drives
About This Video
This video will walk you through tuning the ABB ACS355 Variable Frequency Drive (VFD) to your AC Motor. The tuning process is extremely simple and will make sure you are getting the best possible performance out of your AC Motor. Tuning is absolutely necessary when attempting to run any application that requires high torque at lower speeds.
Video Transcript
Hello everyone. My name is Craig Chamberlain with Precision Electric at precision-elec.com, your industrial automation service center, drives, motors, controls. We’ve done it for well over 30 years so feel free to give us a call if you have any questions. This video is going to cover a more advanced feature of the ABB ACS 355 variable frequency drive, in which we’re going to actually tune it.
Now, standard drives don’t come pre-tuned because tuning requires a connection to your motor. So after you’ve wired your drive up connected it to the motor, we can go through the tuning process. Now, just so you know, in order to tune the drive to the motor, you do need to have the nameplate information off of your motor. most motors have it printed right on it. It’ll give you the motors current, rpm, voltage. Essentially, we’re going to enter that into the drive. We’re going to tell it all the characteristics of the motor and then we’re going to run a command on the drive to actually tune it.
So let’s go ahead and do it. The first thing we need to do is enter the main menu. So I’m going to press the menu button and I’m going to go to the parameters. I’m going to press the Enter key and once the parameters come up, we’re going to go to parameter group 99 which should be at the top of the list. We’re going to click select and this is we’re going to where we’re going to start entering your motor data. So the first 99 I want is our language the macro we set up in previous video. That’s actually your wiring setup and your controls. This is where we’re going to start our tuning. It’s a 9903. This is our motor type. Now if we look in our manual, we will see that in 9903, there’s two different types of motors we can pick. AM is a synchronous motor. Almost a good majority of you will be using an asynchronous motor.
This is a standard non-permanent magnet motor. PMSM is a permanent magnet motor. The chassis of it actually contains permanent magnets which are required for rotation. This is a more unique situation. Most people don’t have permanent magnet motors. If you have them, you’re probably already aware of it. In my case, I have a standard asynchronous motor so I’m going to keep mine set to AM. Then I’m going to go down to 9904 and this is where we’re going to select our tuning type. I’m going to click Edit and we have scalar frequency which basically means we’re going to do standard volts per Hertz without tuning. But I’m going to go down to vector, and I can choose between vector torque or vector speed.
Vector torque control basically follows your current. In other words, you give it a set point and rather than going at a static speed, it follows a static load. So in other words, it might speed up or slow down to maintain a constant torque. Now this is very popular for like a wire drawing machine where they have to maintain a certain amount of tension in the line because they’re drawing wire through dyes, and so the drive or motor may need to speed up at certain times when the torque is less and slow down when the torque increases. Maybe it gets jammed up a little bit so that you want the drive to slow down. But you want to maintain a constant amount of work as you pull on that strip on that wire. Most people are going to be using vector speed control which we’re going to be using in this demonstration, which basically uses the current from the motor to maintain a constant speed. And that’s why we’re tuning it so that we can get better control of our motors speed at lower speeds.
Essentially the tuning process is what that’s for so now let’s go to 9904 and I did vector speed and let me go to 9905. This is your motor nominal voltage. Most motors will have two different voltages. This one’s a 234 60 volt motor. I chose 230 volts because I’m bringing in 230 volts and my drive is a 230 volt drive. If you bring in 460 volts to your drive and your drive is a 460 volt drive, then I would put the 460 volts information from my nameplate into the drive. But in my instance, I’m going to do the 230 volts because I’m bringing in 230 volts which also tells me for 9906 that’s my current. Right now my nameplate current on my drop my motor is 1.7 amps that’s at 240 volts so I put it at 1.7 motor nominal frequency is. My nameplate frequency my nameplate frequency is 60 Hertz
So I’m going to leave mine the default 60 Hertz. Motor nominal speed is my rpm rating on my nameplate of my motor. Mine 1700 so I set that accordingly and then click Save, My motor nominal power is the actual horsepower rating of my motor. In this case, I set it to a half horsepower which also matches the nameplate information. Then if I go down to ID run, I can turn it on. This will basically initialize the motor ID run or the tuning process. Notice that the light up here begins to flash and it keeps flashing on the screen alarm 219 ID run, which is essentially informing you that the motors about to initialize the ID run on the drive. The ID run is really good because it essentially allows you to tune the drive to the motor and so there it goes.
I went ahead and press the start command and it’s running it now. You’ll notice it’s whining a little bit. One important note to make is while it runs the ID run it is going to rotate the motor. So before you run the ID run make sure you disconnect the motor from any load and also make sure your direction of rotation isn’t going to cause any damage to any external equipment. So right now it’s running the ID run which can take up to 60 seconds and during this process you just essentially wait and it’s gathering current data is what it’s doing is it’s running the motor at different frequencies. It’s adjusting the speed internally. It’s monitoring the current loop inside the drive and that allows it to give you better performance at lower speeds which is as I said before the reason why we’re running a tuning. Notice it’s also adjusting the carrier frequency That’s why you actually hear different audible levels. Sometimes it’s louder other times it’s quieter. That’s another performance test.
So it’s going to try to find the best the best carrier frequency to run the motor out as well for performance. Alright, sounds like it’s finishing up and it has stopped. Alright, and it switched back to off. The light is no longer flashing and the alarm is no longer flashing on the screen and I have officially tuned my motor. So let me go ahead and exit out of this. Now if I just press Start, I’m in local control my speed is at zero. Let me see where I got my actual speed set I hear. Trying to remember where I set my setpoint – ah here’s the issue – guys switch to remote control start. There it goes and now I’m running with the fully tuned motor and that’s it. Okay so now that it’s tuned I just need to verify that it’s actually set to local control. I can press this local remote button to switch and then I’m going to press the start button, and it’ll go whatever my setpoint is on my keypad. I can use the up and down arrow keys. But actually, if I look at my current here my currents actually running lower than it was before. So I’m actually getting better performance already just running without a load. And obviously, I can use my up and down arrow keys to change the speed to whatever I want and stop it any way that I would like.
That’s all there is to this video. Essentially, we have tuned the drive to the motor now we can hook the motor back up to the load and run it as we ran it before and you will get up to pretty much full torque at nearly zero speed. So 5% speed or less, you’ll still get the full torque out of your motor which means you’ll get the best possible performance even at lower speeds. If you have any questions as always don’t hesitate to call us . Remember, we’re Precision Electric at precision-elec.com. My name is Craig Chamberlain. Thank you for stopping by and viewing this video. Don’t forget to check out our other videos at our channel and also we’re only a phone call away. So, drives, motors, controls: you name it, we can do it. I’ll see you in the next video.
