How To Wire Three Phase Power To An SMVector VFD
The SMVector series of drives supports input voltages up to 600 volts. Although these voltages are pretty much the standard in the US, many people do not realize the differences in wiring between single phase and three phase. Wiring a three phase Lenze / AC Tech SMVector drive is relatively straightforward and it follows consistently with previous drive manufacturers standard by landing the leads on L1, L2 and L3
Wiring the SMVector series drive is a simple enough process, but the proper safety precautions should always be taken to ensure injury or death do not occur. For this reason, it is ultimately the responsibility of the one performing to work to take the proper precautions as designated by their local safety laws and regulations.
Abstract:
This article illustrates how to wire an SMVector series drive for a 240, 480 or 600 volt three phase main supply input. It also illustrates how to determine what voltage the SMVector drive is rated for.
Note: This tutorial and task should only be performed by a qualified drives specialist.
How To Wire Three Phase Power To An SMVector VFD:
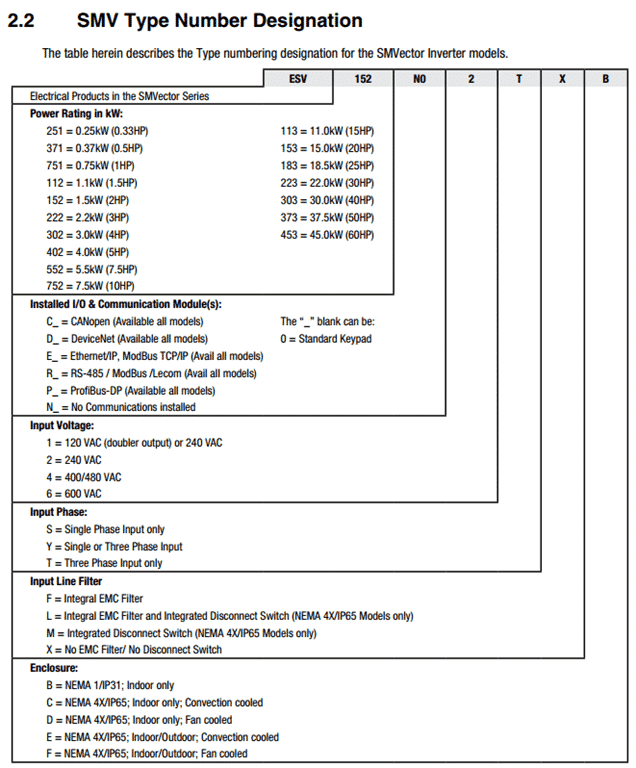
Before You Begin: Make sure the drives input voltage rating is rated for 240, 480 or 600 Volt 3 Phase by looking at the drives nameplate (the demonstration image below shows input voltage of 400/480 V 3 phase).
")
Note: 3 Phase Drives can be powered with 1 Phase but the drive must be derated for the application. Contact us for more details.
1. Make sure the mains power supply you will be wiring has been completely shut off and locked out.
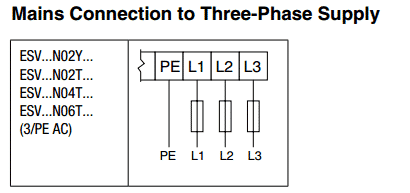
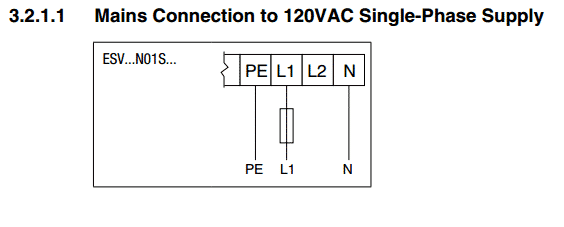
2. Note the manuals wiring diagram for wiring three phase power to an SMVector drive.

3. Wire the Fused A Phase or to the L1 input.

4. Wire the Fused B Phase to the L2 input.
![SMVector - Wire 240 Volts To L2_thumb[2]](https://www.precision-elec.com/https://www.precision-elec.com/wp-content/uploads/2013/01/SMVector-Wire-240-Volts-To-L2_thumb2.png "SMVector - Wire 240 Volts To L2_thumb[2]")
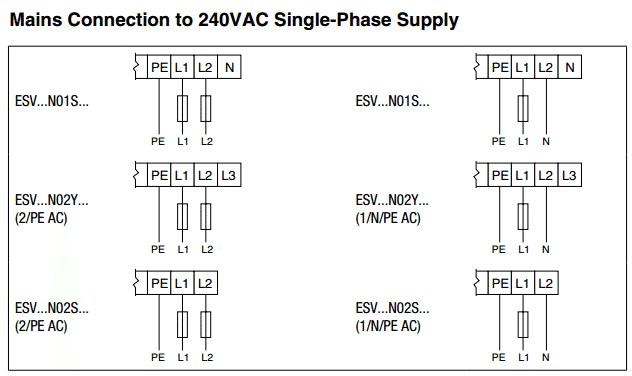
5. Wire the Fused C Phase to the L3 input (Note: In this image it displays N, but on a standard 3 phase drive it will be L3).
")
6. Wire the ground to the PE, or ground, input.
![Step-4---Wire-120-Volts-Ground-to-PE[2]_thumb](https://www.precision-elec.com/https://www.precision-elec.com/wp-content/uploads/2013/01/Step-4-Wire-120-Volts-Ground-to-PE2_thumb1.png "Step-4---Wire-120-Volts-Ground-to-PE[2]_thumb")
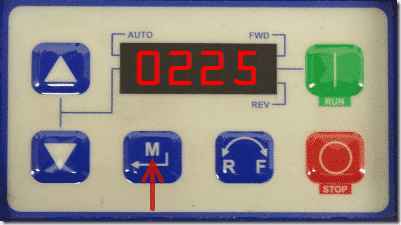
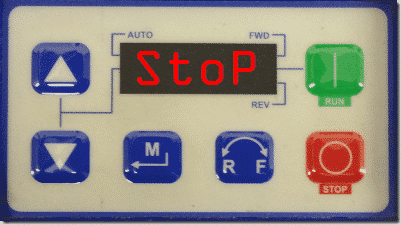
6. Apply power to the drive. You should be greeted with the following display on the keypad.
![Step-6---You-Should-Be-Greeted-With-[2]_thumb](https://www.precision-elec.com/https://www.precision-elec.com/wp-content/uploads/2013/01/Step-6-You-Should-Be-Greeted-With-2_thumb1.png "Step-6---You-Should-Be-Greeted-With-[2]_thumb")
Conclusion:
If you run into any issues when accessing your SMVector parameter menu, feel free to contact us for support. Precision Electric takes pride in offering technical support services to all of their existing or future customers.


![Step-4---Wire-120-Volts-Ground-to-PE[2]](https://www.precision-elec.com/https://www.precision-elec.com/wp-content/uploads/2013/01/Step-4-Wire-120-Volts-Ground-to-PE2.png "Step-4---Wire-120-Volts-Ground-to-PE[2]")
![Step-6---You-Should-Be-Greeted-With-[2]](https://www.precision-elec.com/https://www.precision-elec.com/wp-content/uploads/2013/01/Step-6-You-Should-Be-Greeted-With-2.png "Step-6---You-Should-Be-Greeted-With-[2]")


")


")


![Step 1 - SMVector Keypad LCD - Stop_thumb[1]](https://www.precision-elec.com/https://www.precision-elec.com/wp-content/uploads/2013/01/Step-1-SMVector-Keypad-LCD-Stop_thumb1.png "Step 1 - SMVector Keypad LCD - Stop_thumb[1]")
![Step 2 - SMVector Keypad LCD - Menu Button_thumb[1]](https://www.precision-elec.com/https://www.precision-elec.com/wp-content/uploads/2013/01/Step-2-SMVector-Keypad-LCD-Menu-Button_thumb1.png "Step 2 - SMVector Keypad LCD - Menu Button_thumb[1]")
![Step 3 - SMVector Keypad LCD - Password_thumb[1]](https://www.precision-elec.com/https://www.precision-elec.com/wp-content/uploads/2013/01/Step-3-SMVector-Keypad-LCD-Password_thumb1.png "Step 3 - SMVector Keypad LCD - Password_thumb[1]")
![Step 4 - SMVector Keypad LCD - Press And Hold Up_thumb[1]](https://www.precision-elec.com/https://www.precision-elec.com/wp-content/uploads/2013/01/Step-4-SMVector-Keypad-LCD-Press-And-Hold-Up_thumb1.png "Step 4 - SMVector Keypad LCD - Press And Hold Up_thumb[1]")
![Step 5 - SMVector Keypad LCD - Enter Default Password_thumb[1]](https://www.precision-elec.com/https://www.precision-elec.com/wp-content/uploads/2013/01/Step-5-SMVector-Keypad-LCD-Enter-Default-Password_thumb1.png "Step 5 - SMVector Keypad LCD - Enter Default Password_thumb[1]")
![Step 5 - SMVector Keypad LCD - Parameter Menu_thumb[1]](https://www.precision-elec.com/https://www.precision-elec.com/wp-content/uploads/2013/01/Step-5-SMVector-Keypad-LCD-Parameter-Menu_thumb1.png "Step 5 - SMVector Keypad LCD - Parameter Menu_thumb[1]")